| FAQ | Setup Tutorial | Phone Config Guides | Calling Portals | Customer Support | Requirements |
Grandstream HandyTone 486
This is a router and ATA adaptor with a WAN, LAN interface, PSTN and POTS line enabling you to use a traditional phone or fax machine as a SIP enabled IP device. The PSTN line (FXO) is not usable via SIP. It only used as a fallback for power failure. This device includes a NAT Router for your home or small office.
|
STEP 1 Connect an Ethernet cable from your PC to the Handytone 486 LAN port. Make sure that your PC Ethernet Internet Protocol (TCP/IP) is set to “Obtain an IP address automatically” . |
|
STEP 2 Go to any browser equipped computer on your network and enter the address: http://192.168.2.1 |
|
STEP 3 You will be prompted to enter a password, the default is "admin", then click the "Login" button. |
|
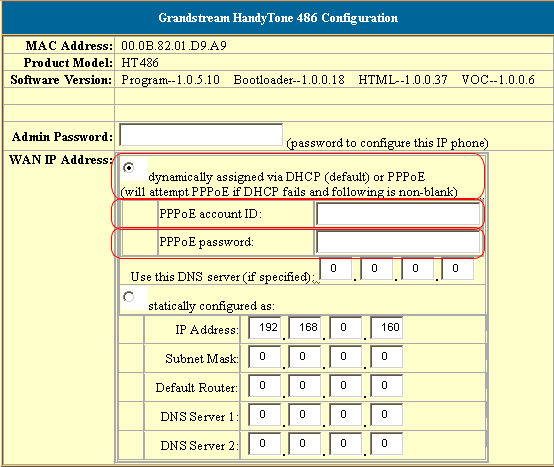
STEP 4 Plug in an Ethernet cable from your Cable or DSL modem into the WAN port of the Handytone 486. If your ISP assigns you IP number by PPPOE, enter the information assigned by your ISP into the circled areas.
|
||
 |
||
|
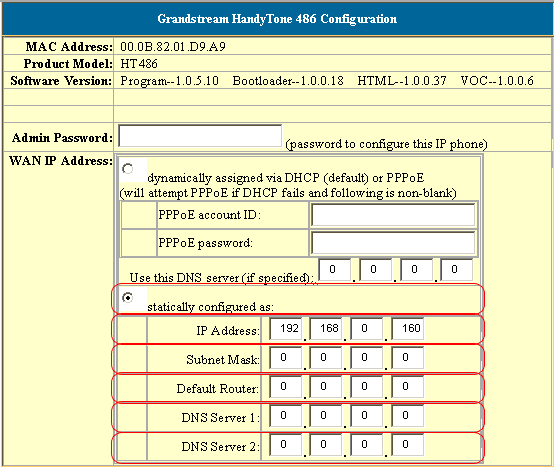
If your ISP assigns you a static IP then
enter the information assigned by your ISP into the circled areas: |
||
 |
|
STEP 5 You need to modify only a few parameters from the factory default. They are listed here:
|
||
| SIP Server: | sip.aqmxtel.com |
|
| SIP User ID: | Enter the phone number you chose when you signed up for our service. | |
| Authenticate ID: | Enter the phone number you chose when you signed up for our service. | |
| Authenticate Password: | Enter the password that you chose when you signed up for our service. | |
| Name: | Enter your full name. This will show up as part of your callerid. | |
| SIP Registration: Yes |
 |
|
| NAT Traversal: No |
 |
|
| TFTP Server: | Change IP to 168.75.215.189 |
 |
| 1. Set
"Enable Call Feature" to "yes"
2. Then pick up the telephone that is
connected to the HT486, upon hearing the dial-tone press *92.
|
||
|
|
||
| Send DTMF: | via SIP INFO |
|
|
STEP 6 Click on the "Update" button at the bottom of the form. |
 |
|
STEP 7 You will be brought to a confirmation screen on which you will click on the only option available: "Click to view your changes". |
|
STEP 8 Click on the "Reboot" button at the bottom of the form. |
 |
|
STEP 9 Make calls! |