|
Linksys WIP300
The Linksys WIP300 Wireless-G IP Phone enables high-quality voice over IP (VoIP)
service through a Wireless-G network and high-speed Internet connection. Connect
at home or your office and make low-cost phone calls through your Internet
Telephony Service Provider.
The WIP300 Wireless-G IP Phone operates in the 2.4GHz band, supports 802.11g
and the latest VoIP SIP protocols. The large, full-color high resolution display
features an intuitive user interface enabling users to easily and quickly
configure the handset using Secure Easy Setup (SES).
STEP 1
Press the Power button to turn on the Phone.
STEP 2
Press the Menu Soft Key.
 STEP
3 STEP
3
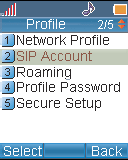
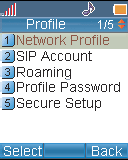
Scroll to Profile , then press the Navigation
button to enter the Profile menu.
 STEP
4 STEP
4
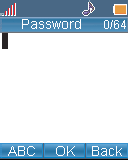
You will see a message asking you to create a password. Press the
Navigation button, then use the numeric keypad to enter a
password. When you are finished entering a password, press the
Navigation button to save it.
 STEP
5 STEP
5
Scroll to SIP Account , then press the Select
Soft Key to enter the SIP Account menu.
 STEP
6 STEP
6
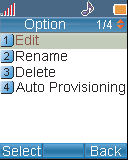
Press the Option Soft Key, then press the
Select Soft Key to edit the default SIP account.
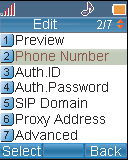
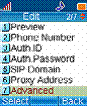
STEP 7
Highlight each setting your service provider requires you to change,
then press the Select Soft Key to change the setting.
|
|
Enter the following information:
|
| |
PHONE NUMBER
|
Your 7 digit Virtual Number
|
| |
SIP DOMAIN |
sip.aqmxtel.com |
| |
PROXY ADDRESS |
sip.aqmxtel.com |
| |
CODEC |
729a |
- In order to change the default codec to G729a, scroll down to Advanced,
press Select, scroll down to Codec and
press Select.
|
 STEP
8 STEP
8
If you need to change a setting that does not appear on the Edit screen, scroll
to Advanced , then press the Select Soft Key to enter
the advanced menu.
STEP
9
When you are finished making changes in the advanced settings menu, press the
Back Soft Key until you return to the Profile menu.
 STEP
10 STEP
10
Highlight Network Profile , then press the Select Soft
key to enter the Network Profile menu.
 STEP
11 STEP
11
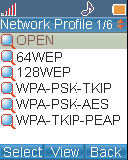
Highlight the network profile that matches the type of security you're using for
your wireless network. If you don't have security enabled on your wireless
network, highlight OPEN .
 STEP
12 STEP
12
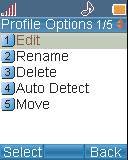
Press the Option Soft Key to enter the Profile Options menu,
then press the Select Soft Key to edit the network profile.
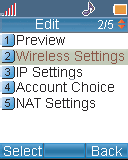 STEP
13 STEP
13
Highlight Wireless Settings , then press the Select
Soft Key to enter the Wireless Settings menu.
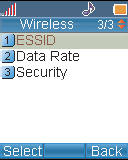
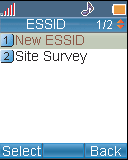
STEP 14
Highlight ESSID , then press the Select Soft Key to
enter the ESSID menu.
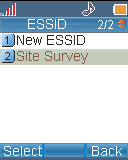
STEP 15
Highlight Site Survey , then press the Navigation
button to scan for your wireless network.
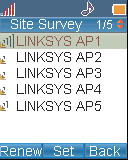
You will see a list of wireless
networks in range of the Phone. Highlight your wireless network's
ESSID name in the list, then press the Navigation
button to select it. Continue with step 16.
 STEP
16 STEP
16
If you don't see your
wireless network's ESSID name in the list, your wireless network may
not be set to broadcast its ESSID name.
To enter the ESSID name manually, press
the Back Soft Key to return to the ESSID
menu, highlight New ESSID , then press the Navigation
button to edit
When you are finished entering the
ESSID name, press the Navigation button to save it.
STEP 17
Make Calls!
|