Sipura SPA-3000/3102
Configure your SPA3000 to use your local line for local calls and
AqmxTel for national and international long distance using the same phone device.
You will not need to dial 011 + country code. Dial using your own country's dial
plan.
This configuration allows you to easily connect a
SIPURA 3000 phone adaptor to combine your AqmxTel account with your existing
home phone number. Make Free calls to other AqmxTel members, save money on all
of your long distance calls and keep your own phone number using one single
phone adaptor that's easy to use and easy to install. OneLine also lets you
access your AqmxTel account from your mobile phone so you can use it like you
would use a phone card.
How it works:
Receive your phone calls to your local line in your country and your phone calls
to your Virtual Number or DID in the same phone device. When dialing a 7 or
greater digit phone number, the SPA3000 will automatically access your PSTN line
and make a local phone call.
- When dialing 9 + 01 + city code + phone number,
the SPA3000 will place a MEXICO national long distance call through your AqmxTel
account.
- When dialing 9 + 00 + country code + city code
+ phone number, the call will be placed using your AqmxTel account.
- When dialing 9 + 3 to 7 digit number, your SPA3000
will call an AqmxTel service Number like Echo Test or an AqmxTel Virtual Number.
- When calling your PSTN line (local home line)
from another phone or location the phone will ring for 30 seconds in which it
the call could be answered. If the call is not answered the SPA3000 will beep
and prompt you for your PIN. Just enter the PIN followed by the # sign. This
way you can use your VOIP service no matter where you are in your city. When
dialing 9 you will get a second and different dial tone; this is the
confirmation that your call will be placed using your AqmxTel account.
STEP 1
Connect your phone device to the PHONE port of the SPA 3000, then,
connect your PSTN line (local land line) to the LINE port. Connect the Ethernet
(network) cable to the ETHERNET port in order to connect the SPA 3000 to the
internet. You must first determine what IP address it received. To do this, you
need to pick up the phone attached to the Line 1 jack and
dial: **** (four asterisks)
then dial: 110 #
and you will be told the IP address of your
device
(e.g. 192.168.0.100)
STEP 2A (For SPA3000
only, goto STEP 2B for SPA3102)
Go to any browser equipped computer on your network and enter the
address:
http://<IP ADDRESS>/
(where <IP ADDRESS> is replaced by the address
that was given to you in STEP 1).
STEP 2B (For SPA3102 only, goto STEP 3 for SPA3000)
Connect a computer to the ethernet port of the SPA3102:
http:/192.168.0.1/
STEP 3
Click on the "Admin Login" button near the top right side of the screen,
then click on the "Line 1" tab.

STEP 4
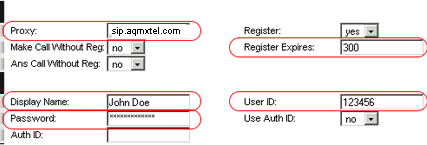
You need to modify only a few parameters from the factory default. They
are listed here:
Proxy:
sip.aqmxtel.com
Display Name:
Enter your Full name, this will show up as part of your callerid.
User ID:
Enter the phone number you chose when you signed up for AqmxTel service.
Password:
Enter the password that you chose when you signed up for AqmxTel
service.
Register Expires:
300

STEP 5
Make the following changes to “Audio Configuration” :

Click on the “Advanced” link and then “Line1” again and replace the dial plan
with the following one:
(*xx|<9,:>[1-9]xx.|<9,001:1>xxxxxxxxxx|<9,00:011>xxxxxxxxx.|<9,01:01152>xxxxxxxxx.|xxxxxxx.<
:@gw0>)
Note: This sample
dial plan uses Mexico's country code. To adapt this dial plan to your own
country, change the 52 (Mexico country code) with your own country code.
Click on PSTN Line and make the following changes:

*Repeat STEP 4 but use a different 7 digit
Virtual Number with its password. This is the account you will use to place
phone calls via AqmxTel when calling your PSTN line and after authenticating
with your PIN.
- Enter a numeric PIN in PSTN Caller 1 PIN.
- Change the PSTN Answer Delay to 30
( If the phone is not answered in 30 sec, the SPA3000 will prompt the
caller for the PIN in order to grant him access to the VOIP line.)
- After entering the PIN dial #
STEP 8
Click on the "Submit All Changes" button at the bottom of the form.
 |
|
